How to Compile and Upload C Code to Esp32
ESP32 is the hottest new wireless chip out there, offering both WiFi and Bluetooth Depression Energy radios rolled up with a dual-core 32-bit processor and packed with peripherals of every kind. We got some review sample dev boards, Adafruit and Seeed Studio had them in stock for a while, and AI-Thinker — the company that makes the most popular ESP8266 modules — is starting upward full-scale production on October 1st. This ways that some of yous have the new hotness in your hands right now, and the rest of you aren't going to have to wait more than a few more weeks.
As we said in our first-look review of the new flake, many things are in a country of flux on the software side, but the basic procedure of writing, compiling, and flashing lawmaking to the chip is going to remain stable. Information technology'southward time to outset upward some tutorials!
Overview
The ESP32 module comes preloaded with a ROM image with an AT control set, only like the ESP8266 did. If you desire to waste matter 95% of this bit's potential past using it as a glorified serial-to-WiFi modem, y'all're all set! Only you all want to dig in, right? Right!
The toolchain for programming the ESP32 in C is pretty straightforward. You'll need Espressif's software library (esp-idf), a cantankerous-compiler and build tools that are specific to the chip (xtensa-esp32-*), and a utility to wink the resulting binary file to the device. I'll guide you thought that and so we'll get Espressif'southward demo application compiled and flashed in, at which signal everything's upwards and running.
 Your first stop is the Espressif IoT Development Framework (
esp-idf) GitHub. We strongly recommend cloning the repository to your local estimator considering it's frequently updated and you lot'll desire to go on it up to date. Here's the command that worked on my Linux auto.
git clone --recursive https://github.com/espressif/esp-idf.git
Annotation the recursive option which pulls downwards all submodules that the framework depends on: in this instance some binary hulk libraries in components/esp32/lib and components/bt/lib as well as the esptool.py program that will actually flash the bit for united states.
If yous just download the zippo file from GitHub, information technology will be missing these essential pieces. Because of the submodules, you'll also need to do a two-footstep to proceed everything current. git pull works for the pinnacle level, and git submodule update --recursive updates all of the submodules.
At present off to get the cross-compiler toolchain. There are instructions for your item operating system within docs. For Linux, MacOS, and Windows alike the fastest mode to get up and running is to download the binary blob from the location listed in the setup file. This is specially true of Windows, where the nice folks at Espressif have pre-packaged all of the control-line tools that you're going to need. Download the toolchain nil file, unzip, and you're near there.
Environment Variables, Role I
The computer needs to know where yous've stored the cantankerous-compiler components, and regardless of which operating system you're using, you have to tell it. (It's 2016: can't my operating organisation simply find and run the requested programs?!) On Linux and Mac, export PATH=$PATH:/path/to/esp/xtensa-esp32-elf/bin will piece of work, where /path/to/esp is wherever you unzipped the cantankerous-compiler binaries. On Windows, you can either set the path permanently by writing export IDF_PATH="C:/path/to/esp-idf into a file chosen C:/msys32/etc/profile.d/esp-path or by typing the aforementioned export command every time you run C:\msys32\msys2_shell.cmd.
Coding, Flashing, Hello World!
At this betoken, y'all should have all the toolchain pieces together. It's time to bank check out the template application: git clone https://github.com/espressif/esp-idf-template. Now merely open up upwards a terminal, cd into the application's directory and type brand. Nothing happens.
Environment Variables, Part II
That'south right, more than paths. The makefile in the sample application needs to know where the main makefile framework (in esp-idf) is located. The documentation that comes with the template application suggests defining an environment variable: export IDF_PATH=/path/to/esp-idf. This is the aforementioned across all systems at this bespeak. Yous might desire to write a shell script or batch file to do this for you lot and include it with your project.
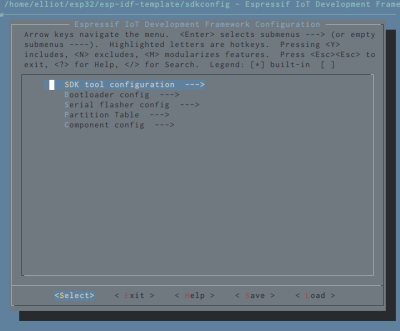 One of the really nice features of the IDF is the carte-driven configuration. The menu options have inverse while nosotros've been reviewing the ESP32 chip, equally more functionality gets implemented, and nosotros're sure that it will continue to change. Nevertheless, here you lot can control a lot of your platform-specific settings: which TTY or COM port you're using, what baud charge per unit, what speed you'd similar the ESP32'southward cores to run at, etc. Pay attention to "Series flasher config" and scan through "Component config" at the very to the lowest degree.
Since this is a moving target, we can't really give you much communication that will still exist valid in a calendar week or 2. You're simply going to want to go through each card entry and make sure that it matches your system. The results of this configuration, when you hit the "Save" option, will be stored in ansdkconfig file. You lot can copy this between projects if yous don't desire to get through the menus all over again.
Ane More Thing
Now you're almost gear up. If you wink the demo app right at present, it won't be able to connect to your WiFi network without your credentials. Open up the main/main.c, observe the "SSID" and "countersign" fields, and enter the particulars for your domicile network. Since this is only a examination of the toolchain, it's optional, but information technology feels practiced to know that the ESP32 can get online.
Flashing the Chip
 With the configuration washed, y'all're ready to connect upwardly the serial port and flash the programme. To put the fleck in the bootloader style, you need to hold the boot-mode pin,
 GPIO0, grounded while grounding and releasing the enable pin, EN. If y'all do this with a terminal application running, yous'll run into "waiting for download" typed out. Close your terminal program, type make flash, and so re-open up the terminal program and you should run across lots of debugging info every bit information technology attempts to connect to your WiFi.
Now you lot're in the loop of coding, flashing, and debugging. Sure, the demo application doesn't really exercise anything. The betoken is that if you've gotten this far, yous can compile, wink, and run code on the device. And that's the starting time stride!
Recap
Getting upwards and running is "easy". Clone the repository with the esp-idf libraries, download and unzip the binary toolchain, and clone the template app. At that place are 2 surroundings variables you take to define: i for the path to the toolchain binaries, and some other for the location of the libraries. Run make menuconfig and make flash inside the template application, and you should be off to the races.
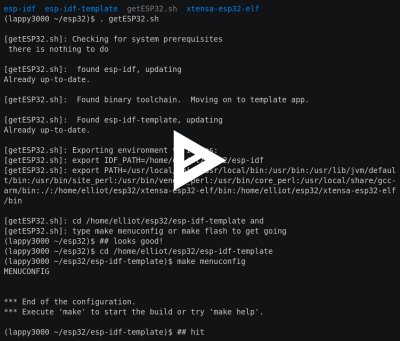
If you're on a Linux system, here is a setup script that does everything mentioned in this tutorial. Create a directory where you'd like everything installed, copy this file in there, blazon . getESP32.sh and watch it go. If you've installed things earlier, it pulls downwards the latest version of everything from GitHub and re-defines the surround variables for you. Even if you don't want to use it or take an odd setup, reading through it is a handy checklist to make sure that y'all've got everything accounted for. Let me know if it doesn't work for you, and we'll fix information technology.
Note that although this sounds like a lot of work, it's all a i-time setup cost. For your next program, you'll just copy the demo application folder, go into principal/main.c and starting time coding. Depending on how y'all've configured things, yous may need to set those two environment variables again (make a script/batch file!) but that's it.
On the subject of coding, there is more than than a little chip of black magic in getting a dual-cadre microcontroller to play along with a real-time operating system. If you've never done and so, stepping upwards to the ESP32 is going to exist a flake of a learning experience. We'll cover FreeRTOS and some of its programming conventions as they apply to the ESP32 next fourth dimension. Stay tuned, and let the states know in the comments if you give this a try, or want to run into annihilation else.
kollmansqualleave.blogspot.com
Source: https://hackaday.com/2016/10/04/how-to-get-started-with-the-esp32/
0 Response to "How to Compile and Upload C Code to Esp32"
Post a Comment